Saturday, February 23, 2013

Green Pepper Steak Stir Fry

Oh my goodness...I am ashamed of myself for how long it's been since I last posted.  All I can say is life.  Life has taken over my free time, and my cooking. The home cooked meals in this house had gone from 5 or 6 times a week, down to about 1 or 2.  My poor fiance. I don't think he can even look at one more sandwich.

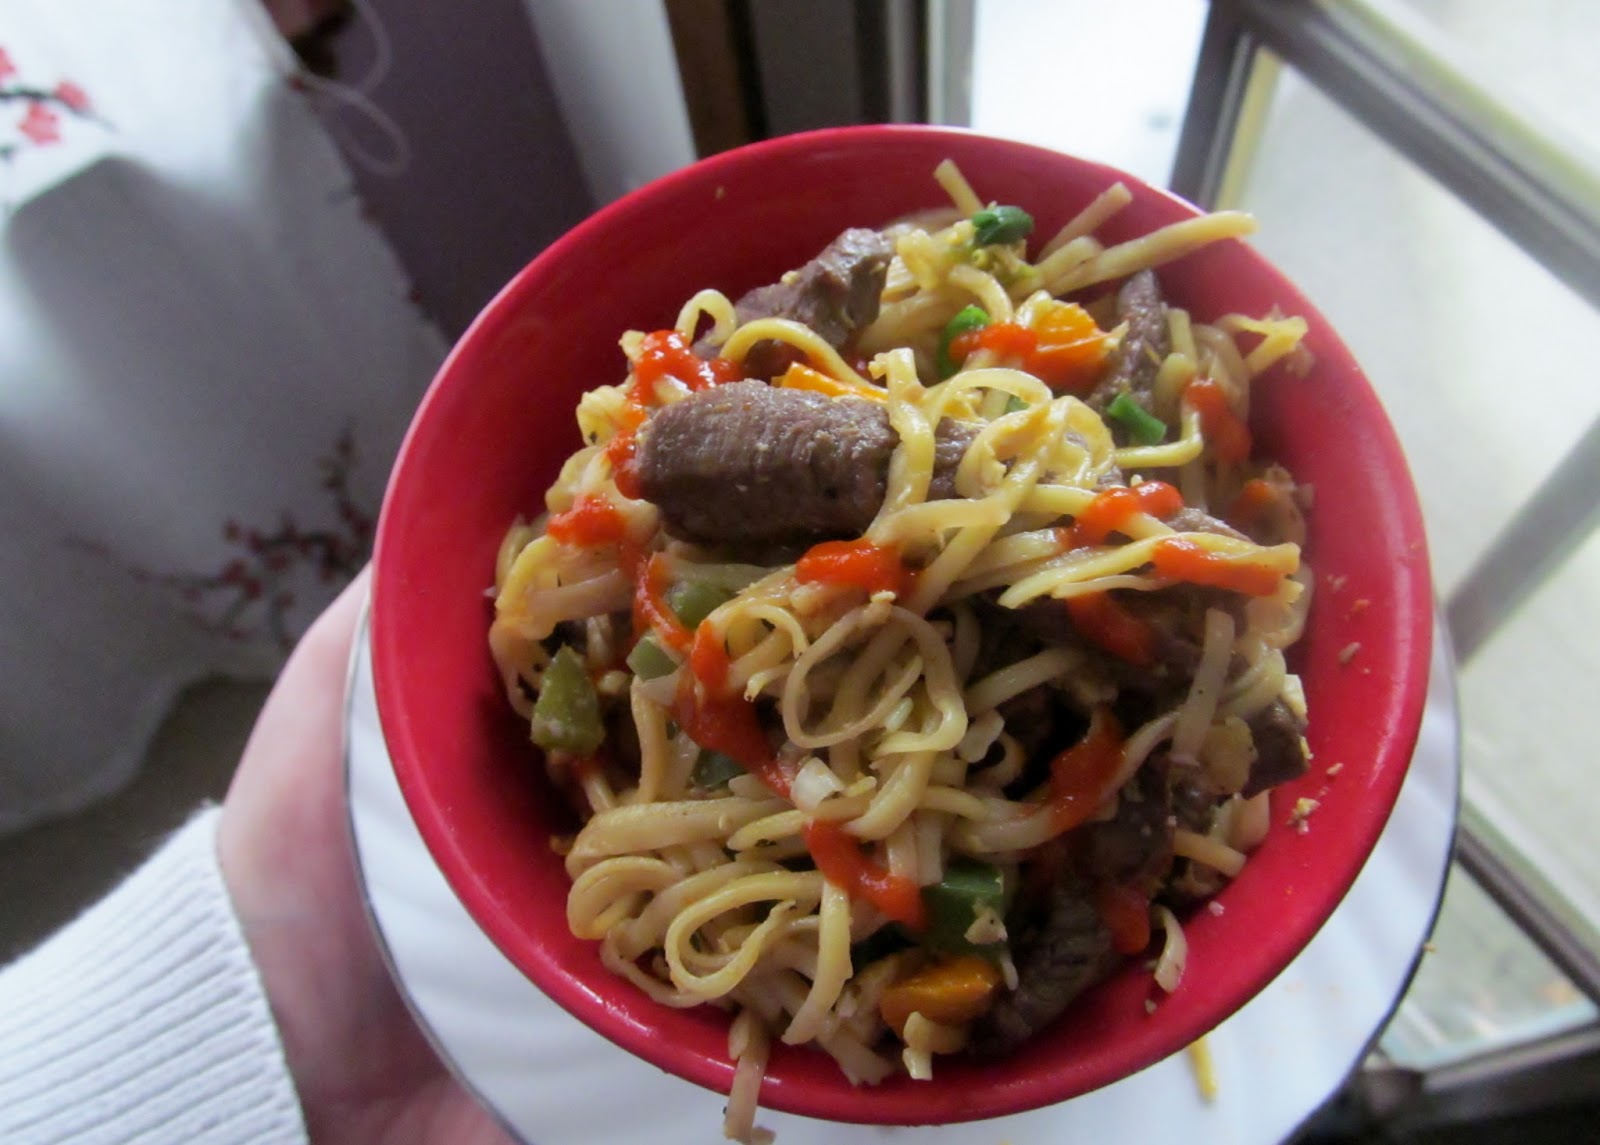
Well I am back, and I am going to try to not be so neglectful of this blog, my fiance, or food.  When I went to the grocery store I saw stir fry noodles on an end cap that were on sale for $2.  I have never made a stir fry before.  I didn't even know how really.  I had a general idea of what went into a stir fry but I had no recipes to follow.  This could either be really good...or really, really bad.  Luckily for us, it was delicious.

I wish I would have written down the exact measurements of what I used, but when I'm cooking something new for the first time, I just rely on my senses to get me through. I'm a taste-as-you-go type of cook. But I'll try and give rough estimates.
Green Pepper Steak Stir Fry

2 packages stir fry noodles
2 green peppers, diced
2 tsps. minced garlic
1/4-1/3 cup soy sauce
2 eggs
salt and pepper
2 bunches of scallions, diced
1 package stir fry beef
olive oil
Sriracha hot sauce

In a large pasta pot, bring water to a boil.  Salt the water as you would pasta, and then dump both packages of noodles in.  Stir and cook for about 3 minutes (or per package instructions).  Drain and rinse with cold water.  Set aside.

Return the pasta pot to the stove and heat up a good drizzle of olive oil.  Add the green onions and season them with salt and pepper.  *Note: go easy on salting because we will be using soy sauce, unless you are using low sodium soy sauce* Cook peppers for 5 minutes over medium heat until softened.  Add the beef and 1/4 to 1/3 cup soy sauce.  Let this all cook together until the meat is cooked to your liking.  Continue stirring so the soy sauce doesn't stick or burn.

Give the mixture a taste at this point.  Adjust salt and pepper according to taste, but remember to go light on salt, because we will be adding a little more soy once the noodles are added.

Remove the pot from the heat and the garlic add both eggs, scramble the eggs using the residual heat of the beef mixture.  Return pot to heat, and add the drained noodles.  Mix everything together until the noodles are heated through.  Add more soy sauce if desired.  I added another generous drizzle at this stage.  Add the scallions and toss.  Serve noodles hot, using chopsticks if desired.  Don't forget to drizzle with Sriracha for a little spice.
I'm eating the left overs for breakfast.

Friday, September 7, 2012

Creamy Corn and Bacon Risotto

I am by no means a professional cook.  I'm just an ordinary girl who grew to love cooking at a very young age, thanks to a grandmother with the loveliest hands you've ever seen make something, and my mother who has fed me practically my whole life.

Sometimes I make up recipes to share on here.  Sometimes I tweak a recipe of another that I've seen or heard of, and make it my own.  And sometimes I take the recipe of a fellow cook and try to recreate it.  You see fancy food blogs and professional looking pictures all the time.  But can a regular person, like me, make the recipe look like the photo?

I have to tell you, often times the answer is no.  People have high tech cameras, and that program to edit photos...I'm blanking on the name....ahhh!  I hate that.  Anyways, they have ways to make food look amazingly bright and beautiful. But have you ever taken that same recipe and made it at home, just to find it looks nothing like the picture?  It happens to me all-of-the-time more often than I'd like to admit.

Photoshop! Ahh hah! That's the name. I knew it'd come to me if I forgot about it for a second.  Anyways..

I promise you guys what I make here is not fancied up nor are they recipes that are impossible for just the average cook to make.  I am a regular person. I am you!  Just a girl who likes to cook, on a graduate student budget, in a tiny apartment kitchen that has barely enough counter space for a cutting board.  Yes, that is me.
Where was I going with this story?

Oh yes, Risotto.  

Today was my first time ever making risotto.  It's always seemed like a very daunting thing to make.  And different recipes have very specific directions, such as cook for exactly 18 minutes! Well I have to tell you this wasn't ready after 18 minutes.  I did not have a recipe for this, all I had was a general idea as to how to make basic rice.  

This was no more challenging than making a box of rice-a-roni and come on...I know we've all made that at least once.  Again this is my own version.  No fancy ingredients here. Who really wants to pay $8 for a little container of mascarpone cheese anyways?  I didn't think so...

Creamy Corn and Bacon Risotto (Serves 2)

3/4 cup arborio rice
4 cups chicken stock
4 slices bacon, cut into small pieces
1/2 stick unsalted butter
2 ounces cream cheese
1/3 cup Parmesan cheese, grated
1 ear of fresh sweet corn, kernels cut off
Pepper

In a large pot set over medium to medium high heat, cook the bacon until the fat has rendered and the bacon is crispy.  Remove bacon with a slotted spoon and discard of most of the fat, reserving at least 1 Tbs. of grease in the pan.  Add the butter and let it melt, then add the rice.  Cook the rice in the fat for a couple minutes just to toast it up a little.  Season with a couple turns of your pepper mill.  (I did not add any salt whatsoever.  For my taste there was enough salt from the bacon and the stock.)

Meanwhile, have a smaller pan set over low heat, keeping the chicken stock warm.  Once the rice has toasted for a couple minutes, add in a ladle full of stock.  This risotto requires constant stirring.  I know it's annoying to stand and stir for 20 minutes straight but at least this risotto is a sufficient meal, along side a salad, so you don't have to make anything else.

Once some of the liquid has absorbed, add in 2 more ladles full of stock.  And you're just going to keep repeating this process until all of the stock is used up.  Add stock, stir stir stir, when most of it's absorbed then add more stock, stir stir stir, wash rise and repeat. The whole process should take about 20 or so minutes.  This could vary, so just eye ball it.

Once you get down to about 2 ladles of stock remaining, that is when you'll add the rest of the ingredients.  Add in the remaining stock, the cream cheese, corn and Parmesan cheese.  Stir everything together until it is melted and delicious.  When you taste the rice it should be "al dente", meaning it's tender but still has some bite left to it.  Sprinkle in half of the reserved bacon and then plate the risotto in a shallow bowl or on a plate along side a fresh salad.  Top with more bacon pieces and more Parmesan cheese.  Serve and eat immediately.
Not bad for us regular folks, eh?

Wednesday, September 5, 2012

Light Lemon and Spinach Pesto (Nut Free)

I am so thankful that I do not have food allergies.  I used to babysit this little girl who was allergic to nuts.  It did not matter what kind.  If she got near anything with nuts, it was an immediate trip to the hospital.  Unbeknownst to me I had made peanut butter cookies for the family. It was close to Halloween and I was heading over to babysit for a night. I wanted to do something nice so I took them cookies...cut to me never babysitting for them again.
I've known several people with allergies to dairy.  I even knew a girl who was allergic to chocolate.  Okay, maybe she wasn't allergic to chocolate, but she didn't like it.  How can anyone not like chocolate? She must have been allergic...yep lets go with that.
I really love pesto.  It is good slathered over chicken, fish or any kind of meat, drizzled over eggs or bread, mixed with some mayo to spread on a panini, tossed with pasta, you name it.  I'm pretty sure you could top it on almost anything and it'd be delicious.  Maybe not like, you know, ice cream, but hey someone out there might like that.

This pesto is nut free, for any of you out there that have allergies. Of course, if you wanted nuts in this, you could easily add any kind you'd like. The traditional nut being pine nuts, but I've made pesto with pistachios, walnuts, etc.  Also, pesto is a great way to use up any greens you have that are about to go bad.  For example, my spinach was about to rot, so I made pesto!  You can make pesto with herbs, leafy greens like spinach, arugula, kale...the combinations are honestly endless.  Find one to make that has all of the flavors you like.

Light Lemon and Spinach Pesto

2 cups spinach
2 tsp. lemon juice
1/2 tsp. lemon zest
1/4 cup olive oil
1/4 cup Parmesan cheese
salt and pepper

In a food processor, add the spinach, lemon juice and zest.  Pulse a few times until the spinach has broken down.  Then with the mixer running, slowly drizzle in the olive oil until combined.  Add salt, pepper and Parmesan cheese.  Give the processor another whirl then taste.  Adjust seasonings if needed.  Use immediate or store in an air tight container in the fridge for up to 3 days.
 I think I'll go make some chicken paninis with this pesto for my lunch.  

Tuesday, September 4, 2012

Homemade Peppermint Patties

I'm not usually a big fan of mint and chocolate together.  I've never liked peppermint patties before.  The mint was always too strong for me.  Reminiscent of toothpaste or some type of strange oil my grandmother used to have in her bathroom.
I've also never liked mint chocolate chip ice cream.  I can tolerate an Andes Mint now and then but that is about it.
 That is until now anyways.  Making your own candy always seems like such a daunting task.  When in half the time I could put some shoes on and run down the street to the little convenience store and buy a handful for a couple dollars.  I come to surprise myself often how much easier it is to make than I allowed myself to believe.  Not only that, how much more DELICIOUS it tastes than the store bought.
These homemade peppermint patties were just right for me.  The mint inside was delicate and just barely tickles your tongue.  It's enough to taste but not enough to feel like you need to gurgle and floss afterwards.  Eww toothpaste candy. I promise this is NOT that!

Homemade Peppermint Patties

2 cups powdered sugar, sifted
1-1/2 Tbs. unsalted butter, room temperature
1/4 tsp. vanilla
1/4 tsp. peppermint extract
2 tsp. half and half

In a mixer fitted with a paddle attachment, mix all ingredients above until combined and smooth.  Chill in fridge for an hour.  After an hour has passed, using a 1/2 Tbs. measure, scoop out balls of the peppermint dough and roll in between your hands.  Flatten slightly by pressing down with your fingers.  Set on a cookie tray lined with aluminum foil.  Once you've used all of the mixture, return to the fridge for another hour.  Meanwhile make the chocolate dip.

Chocolate Dip

1 cup milk chocolate chips
1 Tbs. unsalted butter
1 Tbs. half and half

Over a double boiler (a pot of boiling water with a glass bowl on top) melt the chocolate dip ingredients.  Once fully melted, remove from the heat.  Retrieve the peppermint patties out of the fridge.  Place them one at a time into the chocolate mixture, making sure to coat all sides.  Use a fork to get the patties out of the chocolate and put back onto the tray.  Once you've dipped all of the patties return the tray to the fridge so the chocolate can harden.  Once the chocolate is hardened, store the patties in the fridge in an airtight container.
 I give this recipe the chocolate thumb print of approval. 

Tuesday, August 28, 2012

Bacon and Peach? Sandwiches on Pretzel Buns

Sigh...
I need to apologize for my unannounced leave of absence.  I realize my posts have been few and far between lately, and I hate to think I have left anyone hanging.  I have no excuse other than lately my recipes have been a flop.

No...more like, an inedible mess.  

Do you ever get like that?  Find yourself in a cooking slump...unable to think of anything new and exciting to make?

That's been me lately. I wish I could show you all of the failures I've had lately, but trust me, I did not want photographic evidence of these recipe disasters.

I was slowly strolling the aisles of Costco, pouting no doubt...when I found these little petite pretzel buns.  I have bought them before, and made delicious cheddar burgers on them.  I threw them in my basket and continued shopping.  By the end of my Costco trip my basket was overflowing with goodies.  A big box of white peaches, a block of my favorite Tillamook vintage white cheddar cheese, bacon, some Pirate's Bootie (white cheddar popcorn) and some staples.
As soon as I got home from the store  I immediately ripped open the pretzel rolls and had a taste.  They were salty and tasted like pretzels (duh).  Next I sliced a piece of that vintage white cheddar off and had another taste.  Yum this would be good on the pretzel rolls.

I looked over at the peaches.  What am I going to do with a 5 pound box of peaches before they go bad?  I know lets slice them and put them with the cheese and pretzel rolls.  And hello, what doesn't taste better with bacon?

Bacon and Peach Pretzel Bun Sandwiches

2 pretzel rolls, sliced in half
4 thin slices of white cheddar cheese
1 white peach, sliced thin
handful of spinach
4 slices of bacon

Assemble the rolls in front of you and start piling on the ingredients.  Layer spinach, bacon and peach slices evenly across the bottom of the rolls.  Top with cheese then put the top of the sandwich on.  Put into a panini press for a couple of minutes just to melt the cheese and warm up the roll.

Serve and eat immediately.
Salty pretzel bun, crispy bacon, sharp white cheddar and sweet juicy peaches? Yeah that's not weird at all.

Saturday, August 11, 2012

Chocolate Mocha Granola

I recently just got back from vacation in Oregon and it was really great to see my family and Charlie my dog.  When I moved to Chicago I decided to leave him in Oregon, which was a really hard decision for me to make.  He is a farm dog though, and I knew he would be miserable going from a big house and big yard, to a tiny apartment and being indoors all day. So he stays with my parents in Oregon and I know it's the right decision because he is so happy.  And has become a bit of a grandma's boy.  Look at that blanket baby.
While I was home I took him for a few country drives and you can just look at the picture below and see that he is one happy dog.  Who wouldn't be happy with a daily view like that?
 Serenity my friends.

While I was home I also went wedding dress shopping...with my dad! My poor mother was recovering from knee replacement surgery and regrettably couldn't go with us.  I was so surprised that my dad was as good of a sport as he was.  He helped me in and out of wedding gowns, and made very thoughtful and insightful comments as to what looked good (and what didn't).  I found not only one gown, but 2!  My parents got me my dream dresses and I couldn't be happier, or more thankful.  I got to see friends, my lovely nieces, eat at my favorite hometown restaurant, Kwong's cafe, and my grandmother gave me a very special keepsake.  She gave me a pearl ring that my grandfather had given her.  It will be my "something old" on my wedding day.  My dad also made me his french toast, which I love.  It was a yummy brunch. 
  I also love granola for breakfast.  It's one of those things that is super easy (and much cheaper) to make than buy in the store.  Not to mention it just tastes a whole lot better.  The store bought granola is often too hard.  Like teeth-shatteringly-crunchy.  We all know I love crunch, but I'd also love to not be in pain after eating breakfast or a snack.

I've made lots of variations to my general granola recipe.  Sometimes adding dried fruit, different types of nuts and seeds, or peanut butter and white chocolate.  All combos are good in my opinion.  Granola is delicious on top of fruit, ice cream or yogurt, mixed in a parfait, cut into bars for an easy snack on the go, or just by the handful. 
Chocolate Mocha Granola

2 cups old-fashioned oats
1 cup coconut
1 cup slivered almonds
1/4 cup brown sugar
1/4 cup canola or vegetable oil
1/4 cup honey
1 Tbs instant espresso/coffee powder
2 Tbs cocoa powder
2 tsp vanilla
1/4 tsp salt

Mix oats, coconut, almonds and brown sugar in a bowl and set aside.  In a smaller bowl combine oil, honey, coffee powder, cocoa, vanilla and salt.  Mix well then pour over oat mixture.  Stir everything to combine and coat all of the oats and nuts with the chocolate mixture.

Spread evenly onto a cookie sheet and bake at 350 degrees for 15 minutes.  Stir every 5 minutes.  Your house should smell amazing at this point.  After 15 or so minutes, take the granola out of the oven and allow to cool before storing in an air tight container. 
I think I'll have breakfast for dinner tonight.

Iced Coconut Chai Tea

This really shouldn't even be considered a "recipe".  It's that stupidly easy.  So why am I posting it? Well...because it's good. Enough said.
I honestly love coffee shops like Starbucks and Caribou, but I hate the coffee shop price tag.  It's honestly ridiculous how much they charge to mix pre-made chai tea concentrate with milk and then charge me $4.50 for it.  Lame.  And I have to admit it was a convenience thing in the past.  Yes I could easily walk the 10 steps into the kitchen and make a drink myself but why not just let someone do it for me.  Yes I have felt that lazy on occasion, especially when it's so hot outside I literally can't breathe.

I like to buy Tazo or Oregon Chai in a pack of 3 from Costco.  It's so much more cost efficient and you will get way more drinks this way then if you were to go to a coffee shop.  It's worth it.  I typically make my chai cold, over ice with some 2% milk, but I decided to change it up a bit today and make it with coconut milk.  2 ingredients and a few seconds later, you can be sipping your own Starbucks quality chai tea but with the satisfaction of knowing it's costing you a fraction of the price.
Ice Coconut Chai Tea

2 cups Tazo or Oregon Chai Tea Concentrate
1 can coconut milk
Ice

Divide the Chai concentrate among 2 glasses.  Shake the can of coconut milk vigourously, to mix it well.  Divide the coconut milk between the two glasses.  Stir and top with lots of ice to make it nice and chilly.  Sip and enjoy.

*To make a hot chai, simply combine chai tea and coconut milk in a small saucepan and gently heat over medium heat until it steams but does NOT boil.  Pour into mugs and serve immediately.
I'm thirsty.