Friday, September 7, 2012

Creamy Corn and Bacon Risotto

I am by no means a professional cook.  I'm just an ordinary girl who grew to love cooking at a very young age, thanks to a grandmother with the loveliest hands you've ever seen make something, and my mother who has fed me practically my whole life.

Sometimes I make up recipes to share on here.  Sometimes I tweak a recipe of another that I've seen or heard of, and make it my own.  And sometimes I take the recipe of a fellow cook and try to recreate it.  You see fancy food blogs and professional looking pictures all the time.  But can a regular person, like me, make the recipe look like the photo?

I have to tell you, often times the answer is no.  People have high tech cameras, and that program to edit photos...I'm blanking on the name....ahhh!  I hate that.  Anyways, they have ways to make food look amazingly bright and beautiful. But have you ever taken that same recipe and made it at home, just to find it looks nothing like the picture?  It happens to me all-of-the-time more often than I'd like to admit.

Photoshop! Ahh hah! That's the name. I knew it'd come to me if I forgot about it for a second.  Anyways..

I promise you guys what I make here is not fancied up nor are they recipes that are impossible for just the average cook to make.  I am a regular person. I am you!  Just a girl who likes to cook, on a graduate student budget, in a tiny apartment kitchen that has barely enough counter space for a cutting board.  Yes, that is me.
Where was I going with this story?

Oh yes, Risotto.  

Today was my first time ever making risotto.  It's always seemed like a very daunting thing to make.  And different recipes have very specific directions, such as cook for exactly 18 minutes! Well I have to tell you this wasn't ready after 18 minutes.  I did not have a recipe for this, all I had was a general idea as to how to make basic rice.  

This was no more challenging than making a box of rice-a-roni and come on...I know we've all made that at least once.  Again this is my own version.  No fancy ingredients here. Who really wants to pay $8 for a little container of mascarpone cheese anyways?  I didn't think so...

Creamy Corn and Bacon Risotto (Serves 2)

3/4 cup arborio rice
4 cups chicken stock
4 slices bacon, cut into small pieces
1/2 stick unsalted butter
2 ounces cream cheese
1/3 cup Parmesan cheese, grated
1 ear of fresh sweet corn, kernels cut off
Pepper

In a large pot set over medium to medium high heat, cook the bacon until the fat has rendered and the bacon is crispy.  Remove bacon with a slotted spoon and discard of most of the fat, reserving at least 1 Tbs. of grease in the pan.  Add the butter and let it melt, then add the rice.  Cook the rice in the fat for a couple minutes just to toast it up a little.  Season with a couple turns of your pepper mill.  (I did not add any salt whatsoever.  For my taste there was enough salt from the bacon and the stock.)

Meanwhile, have a smaller pan set over low heat, keeping the chicken stock warm.  Once the rice has toasted for a couple minutes, add in a ladle full of stock.  This risotto requires constant stirring.  I know it's annoying to stand and stir for 20 minutes straight but at least this risotto is a sufficient meal, along side a salad, so you don't have to make anything else.

Once some of the liquid has absorbed, add in 2 more ladles full of stock.  And you're just going to keep repeating this process until all of the stock is used up.  Add stock, stir stir stir, when most of it's absorbed then add more stock, stir stir stir, wash rise and repeat. The whole process should take about 20 or so minutes.  This could vary, so just eye ball it.

Once you get down to about 2 ladles of stock remaining, that is when you'll add the rest of the ingredients.  Add in the remaining stock, the cream cheese, corn and Parmesan cheese.  Stir everything together until it is melted and delicious.  When you taste the rice it should be "al dente", meaning it's tender but still has some bite left to it.  Sprinkle in half of the reserved bacon and then plate the risotto in a shallow bowl or on a plate along side a fresh salad.  Top with more bacon pieces and more Parmesan cheese.  Serve and eat immediately.
Not bad for us regular folks, eh?

Wednesday, September 5, 2012

Light Lemon and Spinach Pesto (Nut Free)

I am so thankful that I do not have food allergies.  I used to babysit this little girl who was allergic to nuts.  It did not matter what kind.  If she got near anything with nuts, it was an immediate trip to the hospital.  Unbeknownst to me I had made peanut butter cookies for the family. It was close to Halloween and I was heading over to babysit for a night. I wanted to do something nice so I took them cookies...cut to me never babysitting for them again.
I've known several people with allergies to dairy.  I even knew a girl who was allergic to chocolate.  Okay, maybe she wasn't allergic to chocolate, but she didn't like it.  How can anyone not like chocolate? She must have been allergic...yep lets go with that.
I really love pesto.  It is good slathered over chicken, fish or any kind of meat, drizzled over eggs or bread, mixed with some mayo to spread on a panini, tossed with pasta, you name it.  I'm pretty sure you could top it on almost anything and it'd be delicious.  Maybe not like, you know, ice cream, but hey someone out there might like that.

This pesto is nut free, for any of you out there that have allergies. Of course, if you wanted nuts in this, you could easily add any kind you'd like. The traditional nut being pine nuts, but I've made pesto with pistachios, walnuts, etc.  Also, pesto is a great way to use up any greens you have that are about to go bad.  For example, my spinach was about to rot, so I made pesto!  You can make pesto with herbs, leafy greens like spinach, arugula, kale...the combinations are honestly endless.  Find one to make that has all of the flavors you like.

Light Lemon and Spinach Pesto

2 cups spinach
2 tsp. lemon juice
1/2 tsp. lemon zest
1/4 cup olive oil
1/4 cup Parmesan cheese
salt and pepper

In a food processor, add the spinach, lemon juice and zest.  Pulse a few times until the spinach has broken down.  Then with the mixer running, slowly drizzle in the olive oil until combined.  Add salt, pepper and Parmesan cheese.  Give the processor another whirl then taste.  Adjust seasonings if needed.  Use immediate or store in an air tight container in the fridge for up to 3 days.
 I think I'll go make some chicken paninis with this pesto for my lunch.  

Tuesday, September 4, 2012

Homemade Peppermint Patties

I'm not usually a big fan of mint and chocolate together.  I've never liked peppermint patties before.  The mint was always too strong for me.  Reminiscent of toothpaste or some type of strange oil my grandmother used to have in her bathroom.
I've also never liked mint chocolate chip ice cream.  I can tolerate an Andes Mint now and then but that is about it.
 That is until now anyways.  Making your own candy always seems like such a daunting task.  When in half the time I could put some shoes on and run down the street to the little convenience store and buy a handful for a couple dollars.  I come to surprise myself often how much easier it is to make than I allowed myself to believe.  Not only that, how much more DELICIOUS it tastes than the store bought.
These homemade peppermint patties were just right for me.  The mint inside was delicate and just barely tickles your tongue.  It's enough to taste but not enough to feel like you need to gurgle and floss afterwards.  Eww toothpaste candy. I promise this is NOT that!

Homemade Peppermint Patties

2 cups powdered sugar, sifted
1-1/2 Tbs. unsalted butter, room temperature
1/4 tsp. vanilla
1/4 tsp. peppermint extract
2 tsp. half and half

In a mixer fitted with a paddle attachment, mix all ingredients above until combined and smooth.  Chill in fridge for an hour.  After an hour has passed, using a 1/2 Tbs. measure, scoop out balls of the peppermint dough and roll in between your hands.  Flatten slightly by pressing down with your fingers.  Set on a cookie tray lined with aluminum foil.  Once you've used all of the mixture, return to the fridge for another hour.  Meanwhile make the chocolate dip.

Chocolate Dip

1 cup milk chocolate chips
1 Tbs. unsalted butter
1 Tbs. half and half

Over a double boiler (a pot of boiling water with a glass bowl on top) melt the chocolate dip ingredients.  Once fully melted, remove from the heat.  Retrieve the peppermint patties out of the fridge.  Place them one at a time into the chocolate mixture, making sure to coat all sides.  Use a fork to get the patties out of the chocolate and put back onto the tray.  Once you've dipped all of the patties return the tray to the fridge so the chocolate can harden.  Once the chocolate is hardened, store the patties in the fridge in an airtight container.
 I give this recipe the chocolate thumb print of approval. 

Tuesday, August 28, 2012

Bacon and Peach? Sandwiches on Pretzel Buns

Sigh...
I need to apologize for my unannounced leave of absence.  I realize my posts have been few and far between lately, and I hate to think I have left anyone hanging.  I have no excuse other than lately my recipes have been a flop.

No...more like, an inedible mess.  

Do you ever get like that?  Find yourself in a cooking slump...unable to think of anything new and exciting to make?

That's been me lately. I wish I could show you all of the failures I've had lately, but trust me, I did not want photographic evidence of these recipe disasters.

I was slowly strolling the aisles of Costco, pouting no doubt...when I found these little petite pretzel buns.  I have bought them before, and made delicious cheddar burgers on them.  I threw them in my basket and continued shopping.  By the end of my Costco trip my basket was overflowing with goodies.  A big box of white peaches, a block of my favorite Tillamook vintage white cheddar cheese, bacon, some Pirate's Bootie (white cheddar popcorn) and some staples.
As soon as I got home from the store  I immediately ripped open the pretzel rolls and had a taste.  They were salty and tasted like pretzels (duh).  Next I sliced a piece of that vintage white cheddar off and had another taste.  Yum this would be good on the pretzel rolls.

I looked over at the peaches.  What am I going to do with a 5 pound box of peaches before they go bad?  I know lets slice them and put them with the cheese and pretzel rolls.  And hello, what doesn't taste better with bacon?

Bacon and Peach Pretzel Bun Sandwiches

2 pretzel rolls, sliced in half
4 thin slices of white cheddar cheese
1 white peach, sliced thin
handful of spinach
4 slices of bacon

Assemble the rolls in front of you and start piling on the ingredients.  Layer spinach, bacon and peach slices evenly across the bottom of the rolls.  Top with cheese then put the top of the sandwich on.  Put into a panini press for a couple of minutes just to melt the cheese and warm up the roll.

Serve and eat immediately.
Salty pretzel bun, crispy bacon, sharp white cheddar and sweet juicy peaches? Yeah that's not weird at all.

Saturday, August 11, 2012

Chocolate Mocha Granola

I recently just got back from vacation in Oregon and it was really great to see my family and Charlie my dog.  When I moved to Chicago I decided to leave him in Oregon, which was a really hard decision for me to make.  He is a farm dog though, and I knew he would be miserable going from a big house and big yard, to a tiny apartment and being indoors all day. So he stays with my parents in Oregon and I know it's the right decision because he is so happy.  And has become a bit of a grandma's boy.  Look at that blanket baby.
While I was home I took him for a few country drives and you can just look at the picture below and see that he is one happy dog.  Who wouldn't be happy with a daily view like that?
 Serenity my friends.

While I was home I also went wedding dress shopping...with my dad! My poor mother was recovering from knee replacement surgery and regrettably couldn't go with us.  I was so surprised that my dad was as good of a sport as he was.  He helped me in and out of wedding gowns, and made very thoughtful and insightful comments as to what looked good (and what didn't).  I found not only one gown, but 2!  My parents got me my dream dresses and I couldn't be happier, or more thankful.  I got to see friends, my lovely nieces, eat at my favorite hometown restaurant, Kwong's cafe, and my grandmother gave me a very special keepsake.  She gave me a pearl ring that my grandfather had given her.  It will be my "something old" on my wedding day.  My dad also made me his french toast, which I love.  It was a yummy brunch. 
  I also love granola for breakfast.  It's one of those things that is super easy (and much cheaper) to make than buy in the store.  Not to mention it just tastes a whole lot better.  The store bought granola is often too hard.  Like teeth-shatteringly-crunchy.  We all know I love crunch, but I'd also love to not be in pain after eating breakfast or a snack.

I've made lots of variations to my general granola recipe.  Sometimes adding dried fruit, different types of nuts and seeds, or peanut butter and white chocolate.  All combos are good in my opinion.  Granola is delicious on top of fruit, ice cream or yogurt, mixed in a parfait, cut into bars for an easy snack on the go, or just by the handful. 
Chocolate Mocha Granola

2 cups old-fashioned oats
1 cup coconut
1 cup slivered almonds
1/4 cup brown sugar
1/4 cup canola or vegetable oil
1/4 cup honey
1 Tbs instant espresso/coffee powder
2 Tbs cocoa powder
2 tsp vanilla
1/4 tsp salt

Mix oats, coconut, almonds and brown sugar in a bowl and set aside.  In a smaller bowl combine oil, honey, coffee powder, cocoa, vanilla and salt.  Mix well then pour over oat mixture.  Stir everything to combine and coat all of the oats and nuts with the chocolate mixture.

Spread evenly onto a cookie sheet and bake at 350 degrees for 15 minutes.  Stir every 5 minutes.  Your house should smell amazing at this point.  After 15 or so minutes, take the granola out of the oven and allow to cool before storing in an air tight container. 
I think I'll have breakfast for dinner tonight.

Iced Coconut Chai Tea

This really shouldn't even be considered a "recipe".  It's that stupidly easy.  So why am I posting it? Well...because it's good. Enough said.
I honestly love coffee shops like Starbucks and Caribou, but I hate the coffee shop price tag.  It's honestly ridiculous how much they charge to mix pre-made chai tea concentrate with milk and then charge me $4.50 for it.  Lame.  And I have to admit it was a convenience thing in the past.  Yes I could easily walk the 10 steps into the kitchen and make a drink myself but why not just let someone do it for me.  Yes I have felt that lazy on occasion, especially when it's so hot outside I literally can't breathe.

I like to buy Tazo or Oregon Chai in a pack of 3 from Costco.  It's so much more cost efficient and you will get way more drinks this way then if you were to go to a coffee shop.  It's worth it.  I typically make my chai cold, over ice with some 2% milk, but I decided to change it up a bit today and make it with coconut milk.  2 ingredients and a few seconds later, you can be sipping your own Starbucks quality chai tea but with the satisfaction of knowing it's costing you a fraction of the price.
Ice Coconut Chai Tea

2 cups Tazo or Oregon Chai Tea Concentrate
1 can coconut milk
Ice

Divide the Chai concentrate among 2 glasses.  Shake the can of coconut milk vigourously, to mix it well.  Divide the coconut milk between the two glasses.  Stir and top with lots of ice to make it nice and chilly.  Sip and enjoy.

*To make a hot chai, simply combine chai tea and coconut milk in a small saucepan and gently heat over medium heat until it steams but does NOT boil.  Pour into mugs and serve immediately.
I'm thirsty.

Sunday, July 22, 2012

Apple Cinnamon Pancakes

I don't know what it is about Sunday mornings and pancakes for brunch.  For me it's like peanut butter and jelly, or basil and tomatoes. It just goes together, man.
 This was a really easy breakfast that I wanted to show you guys. Apple cinnamon pancakes.  I used pre-made pancake mix, like Bisquick.  So buy your favorite kind.  Here's a quick way to take ordinary pancakes and turn it into something more special.

What you'll need for Apple Cinnamon Pancakes:
(Feeds 2, double recipe to feed more)

Pancake Mix
Milk
Eggs
1 green apple, peeled
1/4 tsp cinnamon
1/2 tsp vanilla

If you're using Bisquick: Mix 1 cup pancake mix, 1/2 cup milk and 1 egg.  Whisk together in a bowl then add the cinnamon and vanilla.

To get the apple rings, peel 1 green apple and then using a spoon, scoop out the core.  Then slice the apple into thin rings.

In a heated skillet melt some butter.  Add pancake mix by 1/4 cup amounts at a time.  Place an apple ring in the center of the pancake batter (shown above).  Cook for a few minutes on each side until the pancakes are golden brown.  Top with whatever you like. I like butter and syrup.
 I really really really liked these pancakes.  They were sweet and tart and delicious.  The fiance wasn't a fan but I think I scarred him with the last breakfast I made.  I made blueberry waffles and he got a little TOO many blueberries in his. Lately when I say I'm going to make us breakfast he asks "there's no blueberries in it is there?" He's not a huge fruit-in-the-breakfast-batter fan.
No matter.  More for me.

Saturday, July 21, 2012

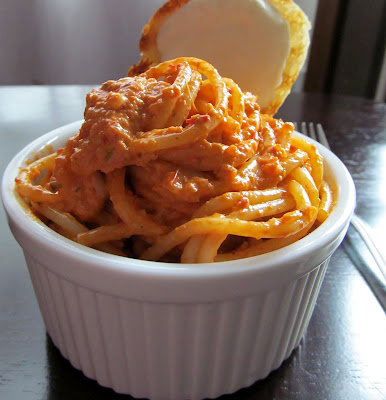
Spaghetti with a Creamy Roasted Red Pepper Sauce

Is there any person out there who doesn't love a super easy dinner idea that can be thrown together 20 minutes before you're wanting to eat?
 I didn't think so.

I'm not that big of a fan of spaghetti.  Probably because growing up spaghetti was pretty underwhelming. My mom would over-cook the pasta and it would be mushy, which was not hidden from the blob of store bought pasta sauce dumped on top of it. (Sorry mama.)  Also I was told growing up that salting the pasta water made it boil faster.  Obviously this isn't why professional cooks (or the more informed cooks) salt their water.  You salt the water to flavor the pasta.  Who knew?!
Spaghetti for me was only good because I used to love The Lady and the Tramp. My dad taught me how to do the spaghetti smooch!  It took me a couple practice tries because I kept biting the strand of spaghetti, but we eventually got it. That is a memory from childhood that is a funny father-daughter moment.
Spaghetti with a Creamy Roasted Red Pepper Sauce
3 jarred roasted red peppers, diced (seeds removed)
1 onion, diced
2 garlic cloves
1 tbs tomato paste
2 tbs basil pesto
1/2 cup white wine
1/3 cup heavy cream
1/4 tsp crushed red pepper flakes (do 1/8 tsp if you want less spice)
olive oil
salt and pepper
Pasta (such as spaghetti, fettuccine, rigatoni, ziti, etc)

Cook pasta per box directions.

To make the sauce: Heat olive oil in a large skillet over medium heat.  Add the onion, crushed red pepper flakes, salt and pepper, and cook for a couple minutes until the onions are tender.  Add in the garlic, tomato paste, red peppers and white wine.  Cook for another 2-3 minutes.  Next place the mixture into a blender and puree until smooth.  Return the mixture to the skillet and add the cream and pesto.  Stir and taste. Adjust seasonings if necessary.

Toss the cooked pasta into the sauce and serve immediately.
That's Amore.

Triple Berry Ice Cream

Nothing in life is free.
I promise you.
 I had a woman call me a couple weeks ago, telling me that I won a "free" Bridal Pampering Package from Mary Kay. Of course the offer sounded great but I was really skeptical about it. But I decided to go for it anyways. I agreed to it, and invited two of my girlfriends over to experience the pampering with me. We had an awesome spread with 4 different types of wines, and lots of nibbles to enjoy while the woman gave us a hand treatment, and did our make up.  It was a lot of fun.

But...remember what I said about nothing in life ever being free?  Yeah...by the time she left this so-called "free bridal pampering" event, we had each spent over $80 in make up and lotions. And not only that, the woman was really pushy and trying to tell me that if I just spend $100 on a start-up kit, I too can host my very own Mary Kay parties and start to sell the products. Oh and don't forget that she has a brand new car outside, that I could surely have too! Yeah lady, I'm sure. 
 Needless to say I'm not THAT mad at myself. I really did need some of the stuff I bought, and not to mention it was a really fun night with good friends and good food. My fiance was a very good sport also. With a house-full of women talking about beauty. I could imagine that would be the equivalent of a house-full of fist pumping dudes talking about beer and babes. (I'm sure my time to endure that type of evening will come eventually.)

One of my friends brought over this huge bowl of a mixed berry salad. It had strawberries, blackberries, raspberries and blueberries.  By the end of the night however it was just a triple berry salad, because being that raspberries are my favorite, I picked them all out.  She left all the fruit here and I had no idea how to use it all before it went bad.  

Oh I know...lets take this healthy bowl of fruit and make it into a not-so-healthy-but-incredibly-creamy-and-delicious-ice cream.  Yep.
 Triple Berry Ice Cream
4 cups of berries (I used blackberries, strawberries and blueberries)
Juice of 1 lemon
1-1/4 cup sugar
1-1/2 cups half and half
1-1/2 cups heavy cream
5 egg yolks, room temperature


Add the berries, lemon juice and 1/4 cup sugar to a medium saucepan. Cook for 20-25 minutes on low, until the mixture has thickened and the berries have broken down.  Strain the berry mixture through a fine mesh sieve and set aside.


In a separate saucepan, heat the half and half with the remaining 1 cup of sugar.  Do not let this mixture boil. You are just heating it up.


In a medium sized bowl beat the egg yolks until they are pale yellow in color and a little thick.  While whisking, slowly pour in the warm half and half mixture.  Once you've added all of the half and half to the eggs, pour the mixture back into the saucepan, and continue cooking over low heat, stirring constantly, until the mixture is thick.  You can test this by dipping a spoon into the mixture, and running your finger across it.  If your finger mark remains, it's ready.


In a large bowl add the cream, and berry puree together.  Strain the egg mixture with a fine mesh sieve and add it to the rest of the cream and fruit.  Place the bowl with the ice cream base into a larger bowl.  Put ice cold water into the larger bowl, but be careful not to get any water into the ice cream base.  This just helps the ice cream base cool down faster.  Place in the fridge and allow to chill until it is very cold.  Mix ice cream according to your machine's instructions.  Place in an air tight container and store in the freezer.

You're welcome.

Sunday, July 15, 2012

Crispy BBQ Chicken Balls with Cheddar and Caramelized Onions

I have been using my crockpot religiously this summer. It's been unbearably hot in Chicago and the last thing I want to do is use the oven.
The crockpot is sooo easy.  This is how I make chicken.  I put the chicken (I like chicken thighs, bone in, skin on) into a crockpot, season with salt and pepper, put the lid on, set the crockpot to high, and let it cook for about 3-1/2 to 4 hours. The chicken cooks in its own juice, and will be falling off the bone tender.  When it's done cooking, you can remove the bone very easily, and the skin.  Drain the liquid, then use tongs to shred the meat, which will be very easy to do at this point.  Then add your favorite BBQ sauce (about 1 cup), or tomato sauce, or whatever. Chicken is done! So simple right?  **If you want to use boneless meat, cook time will be about 2 to 2-1/2 hours.
I made this recipe with left over BBQ chicken that I had made in the crockpot.  It is similar to these chicken balls I made before, with just a few tweaks.  My fiance gobbled these up fast.

Crispy BBQ Chicken Balls with Cheddar and Caramelized Onions
2 cups left over BBQ chicken, shredded
8 oz. cream cheese, room temperature
1-1/2 cups cheddar cheese, shredded
1 onion, sliced and caramelized
salt and pepper
1 cup flour
3 eggs
1/4 cup cream, or milk, or half and half
1-1/2 cups panko bread crumbs
2 tsp smoked paprika

Combine BBQ chicken, cream cheese, cheddar cheese, and caramelized onions.  Allow mixture to chill for 30 minutes in the fridge.  While its chilling, get 3 medium sized bowls.  In one bowl add the flour, in a second bowl add the eggs and cream (or milk or half and half), and in a third bowl add the bread crumbs and paprika.  Mix the bread crumbs and paprika, and mix the eggs and cream.  Season the flour mixture with salt and pepper.

Once the chicken mixture is chilled slightly, using an ice cream scoop for 2 inch balls and set on a plate. Next dredge the chicken balls through the flour, then egg mixture, then ending with bread crumbs.  Set on a cookie tray, and drizzle with olive oil.  Once you've dredged all of the balls, place them in the oven at 375 degrees for 15-20 minutes, or until the balls are hot, the cheese is melted and the bread crumbs are golden brown.
Serve along side ranch or blue cheese dressing for dunking.
Look at that gooey bite!

Wednesday, July 11, 2012

Homemade "Big Hunk" Candy Bars

Sometimes I get a craving for a very specific item. Specific and random. I haven't had a big hunk since I was a kid. They were always delicious but really hard on my teeth. I would often settle for their softer cousin, the Payday. Which instead of nougat it has soft caramel. And of course the salty peanuts.
I found an awesome website (Chow.com) that has recipes for homemade versions of all the delicious candy we've grown to love...Twix, Snickers, Kit Kats, and of course Big Hunks.
This was super easy to make and tasted exactly like the original candy bar that you can buy in stores.  However, it was slightly softer. Which made my teeth happy. Yummy.
This recipe makes a lot of candy. I haven't tried cutting the recipe in half, but I'm sure it would yield similar results if you wanted to try. I cut the candy into smaller sized pieces, and wrapped them each individually. Which took forever, but it was worth it. It makes it easier to just grab a couple to snack on, or give them away.
Homemade Big Hunk Candy Bars:

3 small jars (about 21 ounces) of Marshmallow fluff
2 1/4 cup corn syrup
2 1/4 cup sugar
6 tbs unsalted butter, melted
2 tsp vanilla
1/4 tsp salt
1 jar (16 ounces) roasted peanuts, salted

In a large bowl add the marshmallow fluff and set aside.  Butter a large cookie sheet and scatter the peanuts across it, and set aside.  In a small bowl combine butter, salt and vanilla, and set aside. In a large saucepan add the corn syrup and the sugar.  Set over medium to medium high heat, stirring constantly until the mixture comes to a boil.  When it starts to boil, STOP stirring.  Add a candy thermometer and watch the mixture.  When the mixture reaches 280 degrees Fahrenheit, or the "soft crack" stage, remove from heat, and allow it to sit for 2 minutes.  After 2 minutes, add the corn syrup and sugar mixture to the bowl of marshmallow fluff. Stir to combine, then add the butter mixture, and incorporate that in.  Once combined, drizzle the mixture over the peanuts on the cookie sheet.  Let candy sit at room temperature for a couple hours until it has hardened enough for you to cut into pieces and wrap.

Friday, July 6, 2012

Penne Rigate with a Chunky Basil Pesto Sauce

I realize my posts have been few and far between lately.  I'm sorry for that.  I completed the first semester of my third year of grad school (yay me)!  I've also been a busy bee planning my upcoming wedding, which will be next spring.  And amazingly enough, I found "THE DRESS".  I have been looking and looking at hundreds of dresses and all have been good, but none of them great.  I would like the top of one dress, but the bottom of another. The dress would be too plain, or it would be too blinged out. I was beginning to worry that I wouldn't find "the one" that fit every need I had. But luckily I found it and couldn't be happier.
 I've also taken on the extreme challenge of cleaning out my closet, which is proving to be more difficult than I realized.  You know that favorite pair of jeans you've had for the last 10 years but can't get rid of because you love them too much, they fit perfectly, and you mistakenly didn't buy two pairs when you should have, and even though there is a gigantic hole in the crotch you find ways to justify keeping them? Yeah..I'm having that problem. Or I keep saying to myself, oh I'll wear that again someday...(even though it's been sitting dormant in your closet so long it has permanently stuck in the shape of the hanger).  Letting go is hard, man.

This recipe came to me in my sleep, oddly enough.  If you were to look in my freezer right now you'd find nothing but ice cubes, nuts, and butter.  In my fridge some water and some condiments are all that fill the shelves.  And in my pantry, soup and pasta.  It was amazing that I could make a complete dish.

This is a meatless pasta dish, but I found it to be hearty enough without.  It would be good with some chicken breast tossed in, or some bacon.  Mmm bacon.  

Penne Rigate with a Chunky Basil Pesto Sauce:

12 ounces (or 3/4 of a 1 pound box) Penne Rigate
1 tomato, seeded and diced
1 small red onion, chopped
1 roasted red pepper, diced
1/2 cup frozen peas, thawed 
3/4 cup prepared Basil Pesto
Parmesan cheese
olive oil
salt and pepper 

In a large pasta pot, bring water to a rapid boil.  Salt the water generously then dump in the pasta, cooking until tender but with a bite to it still (about 8-10 minutes).  Meanwhile in a saute pan, drizzle in a few tablespoons of olive oil.  Once the oil gets warm add the onion and sprinkle with salt and pepper.  Saute the onion for a few minutes over medium to medium high heat until the onions are soft.  

Next to the mixture add the red pepper and the tomatoes.  Again season with a little salt and pepper, and allow to cook for a few minutes until everything becomes soft.  Next add in the pesto.  The mixture will be thick.  So, take a ladle full of the pasta water and add to the pesto mixture.  Add by the ladle full until you get the desired thickness that you want.

Once your pasta is done cooking, drain and return to pot.  Pour the pesto mixture over the cooked Penne and toss.  Sprinkle with extra Parmesan cheese.  Eat hot, or at room temperature.

Sunday, June 24, 2012

Cream Cheese Chocolate Chunk Cinnamon Oatmeal Cookies

What a name for a cookie huh? I could have shortened it, but for some reason I wanted you to know exactly everything that went into this cookie.

If you've never had this candy before you should really try it. It's super creamy and has specks for honey and almond nougat running throughout.  I chopped it up and put it into my cookies.  It was really yummy.

It's always a problem for me when I make sweets because the Mr. isn't much of a sweets person.  He's more of a pizza and beer person. So, as a way of not eating the entire batch of whatever sweet thing I have made, I take some to co-workers, but more often then not I am driving them over to my dear friend Carol's house. She's so sweet. She always likes everything I bring, and she doesn't get mad that it's always sugar I'm bringing.  It's a win-win situation really.
These cookies started out as just a regular oatmeal cookie.  I added some cinnamon for a little pizazz, and it was better, but not great yet.  So I added some chocolate chips, then decided I wanted it a bit more chunky.  So I cut up a almond nougat filled candy bar and added that in.  Oh, and don't forget the cream cheese.  These cookies are so soft, even days later. And maybe this is just me, but I feel like these cookies must be healthy, because they have oatmeal in them.  Yep. So go ahead and eat 5 or 6 for breakfast. 

Cream Cheese Chocolate Chunk Cinnamon Oatmeal Cookies

2 sticks unsalted butter, room temperature
8 oz. cream cheese, room temperature
1 cup chocolate chips
2 Toblerone candy bars (3.5 oz. each) cut into chunks
1 cup brown sugar, packed
1 1/2 cups flour
3 cups oats
1 egg
2 tsp. vanilla
1 tsp. baking soda
1/2 tsp. salt
1 tsp. cinnamon
Preheat oven to 375 degrees. Beat butter, cream cheese and sugar until creamy.  Add egg and vanilla, mix well. Combine flour, soda, salt, cinnamon and mix well.  Add to butter mixture and blend well.  With the mixer on low, stir in the chocolate chips and Toblerone pieces, just stirring to combine.  Drop by rounded tablespoons 2" apart on baking sheet lined with parchment paper.


Bake at 375 degrees for 10 minutes.  Leave in pan to cool for 2 minutes.  Put cookies on wire rack to finish cooking.  Store in airtight container at room temperature.  Makes 2 dozen cookies.
I'm going to have some for breakfast now.

Friday, June 15, 2012

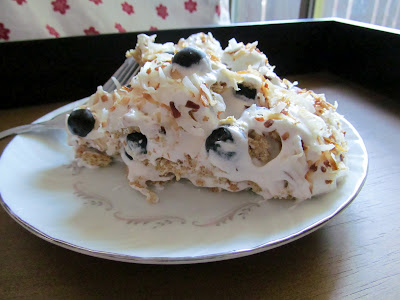
Toasted Coconut Icebox Cake with Blueberries

When I was a little girl, I used to pretend that I was Mary Poppins. Not only did I pretend to be her, I made others pretend as well. I can remember walking around my pre-school classroom saying my name is not Joanna it's Mary Poppins! Silly I know...but I wanted so badly to jump through side-walk chalk drawings, and ride a carousel horse around a park, eat candied apples and dance with penguins in tuxedos.  Ahh the life of a child.  Where imagination is not overrated.  I miss those days.
My love for cooking stems from childhood as well.  For anyone who has read this blog for longer than 5 minutes, you know I often talk of my grandmother and how I used to stand on a kitchen chair next to her, helping her make home-made noodles. Some of my fondest memories are spent with my grandmother.  Her, and Mary Poppins.

This icebox cake is super easy, and might I add healthy. It's a light dessert, perfect for these upcoming hot summer nights.
Toasted Coconut Icebox Cake

2 sleeves graham crackers
16 ounces lite cool whip
1 cup coconut flakes, toasted
1-1/2 cups blueberries

In the bottom of a 9" spring form pan, place a layer of graham crackers.  Break into pieces in order to help them fit.  Spread 1/3 of the whipped cream over the crackers then sprinkle 1/2 cup blueberries.  Repeat 2 more times.  Once you've used all of the ingredients, sprinkle the top generously with toasted coconut.  Refrigerate overnight, and by the next morning the graham crackers will have softened into a perfect cutting consistency.  Slice and enjoy.